Layer Panel

The layer panel controls layer selection and some settings for each layer.
+/-Paints Effect (show/hide with clicking)
Texture
You can select layer texture like canvas paper. To control affection amount you can use the slider below this.
Effect
You can select layer effects like artistic materials, currently only 'Fringe' effect is supported. To control affection amount you can use the slider below this.
|
[Fringe] effect This effect make fringe on edge of opacity like watercolor paintings. Example usage : 1. Create layerset like below [Layer Set] ← With texture (watercolor, drawing paper etc.) [Layer 1] ← Multiply mode, with Fringe effect [Layer 2] 2. Draw to [Layer 1] with brush or water color tool. - Select brush edge shape on right edge (harder shape) - Select density as about 100 - Set blending and dilution about 50 and set presistence about 80. 3. Combine [Layer 1] to [Layer 2] by transfer down command. Repeat step 2 & 3 gives like watercolor painting effect, please adjust parameters suiting your favorite. |
Notice for using Texture & Effect options:
-
If the layer with texture or effect options is combined, texture and effect will directly painted to combined layer.
-
These options is directly painted to layer pixels in PSD export.
-
Texture on layer set is not exported to PSD format.
Mode
Set layer composition mode.
|
Mode |
Effect |
PSD Import/Export |
|
Normal |
Normal composition mode |
Ο Normal |
|
Multiply |
Composition mode with smaller RGB value affect more darken result. |
Ο Multiply |
|
Screen |
Composition mode with larger RGB value affect more lighten result. |
Ο Screen |
|
Luminosity |
Composition mode with larger RGB value affect more lighten result, this effect is similar to linear dodge mode in Photoshop, but coloring affect more strongly in this mode. |
Δ Linear Dodge |
|
Shade |
Composition mode with smaller RGB value affect more shadowing result. |
Δ Linear Burn |
|
Overlay |
If the RGB values are larger than 50% this affect as screen, and if the RGB values are smaller than 50% this affect as multiply composition mode. If the RGB values are just (50%, 50%, 50%) the composition result is same as normal composition mode. |
Ο Overlay |
|
Lumi & Shade |
If the RGB values are larger than 50% this affect as luminosity, and if the RGB values are smaller than 50% this affect as shade composition mode. If the RGB values are just (50%, 50%, 50%) the composition result looks nothing. |
Δ Linear Light |
|
Binary Color |
Each RGB values are translated to binary color, layer opacity is used as thresold for binary translation |
× Normal |
Note for [PSD Import/Export] compatibility
|
O |
PSD import/export with written mode, you can get same result |
|
Δ |
PSD import/export with written mode, but result will be a bit different from original image |
|
× |
No compatibility in PSD import/export, the result is different from original image. |
Opacity
This controls layer opacity with slider.
Preserve Opacity
Toggles keeping or not each pixel's opacity in brush / fill tools.
Clipping Group
Set the layer is clipped by under layer's opacity.
Selection Source
Set the layer as selection source for Bucket and Magic Wand tools.
Layer List
The region of bottom of this panel is layer list, you can select working layer in this list, and this panel provide short cut buttons for layer creation etc. The eye icon toggles each layer is visible/invisible. You can set layers as moving group with clicking the box below eye icon, red pin icon shows moving group is enabled, moving and transformation and filtering current layer affect moving group layer too.
Mouse operations for layer list
|
Clicking layer thumbnail |
Layer editting mode (only when layer has layer mask) |
|
Clicking layer mask thumbnail |
Layer mask editting mode (only when layer has layer mask) |
|
Double clicking |
Change layer name |
|
Ctrl + clicking thumbnail |
Create selection by layer opacity |
|
Shift + Ctrl + clicking thumbnail |
Add selection by layer opacity |
|
Ctrl + Alt + clicking thumbnail |
Subtract selection by layer opacity |
|
Shift + Ctrl + Alt + clicking thumbnail |
Create selection by intersection of layer opacity and current selection |
|
Ctrl + clicking eye icon |
Mark layer as target for shortcut commands 'Show/Hide Marked Parent Layer Set' and 'Show Marked Parent Layer Set Lone' |
|
Alt + clicking eye icon |
Show only selected layer lone |
|
Dragging eye icon |
Bulk selection for show/hide layer |
|
Dragging pin icon |
Bulk selection for moving group |
|
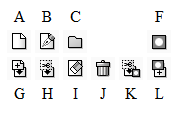
A |
Create new normal layer |
|
B |
Create new linework layer |
|
C |
Create new layer set |
|
F |
Create layer mask |
|
G |
Transfer down |
|
H |
Merge down |
|
I |
Clear layer |
|
J |
Delete layer |
|
K |
Merge down layer and mask individually |
|
L |
Apply layer mask |